11 KiB
How to Set Up Forgejo as a Subdomain on Namecheap/Linode using Docker/Nginx
Introduction
I recently went through the small trouble of setting up Forgejo, a Gitea fork released by the team over at Codeberg and thought I'd document the process for my own reference and for anyone who wishes to make the attempt in the near future. Like all forms of technical documentation, this will likely become out of date as more versions of Forgejo are released.
For those of you new to the coding scene, but familiar with services like Github, you will recognize that Github is one of the most user friendly and ubiquitous version control frontends for Git that there is. That said, as you become more familiar with the landscape, you will discover other version control frontends and hosting providers such as Gitlab, Codeberg, Sourceforge, Gitflic, and many many others.
You might also find yourself looking into self hosted options. This is where you take either a home server or a VPS and host your own front end client for git and git repositories directly. There are several advantages to this including complete control over your repositories. You essentially can copy the repos and take them wherever you go. The code hosted on your repos is your own and is not subject to the whims of a 3rd part like Microsoft with Github. There are of course some downsides, of course, with the most obvious of which being visibility and discoverability, as Github is the de facto place on the web to find new and interesting pieces of software.
All this said, I personally have been delving into the world of self hosting a bit more recently and self hosting my own Git frontend is something I've wanted to do since my mentor first introduced me to Gitea. Forgejo is the spiritual successor to Gitea since they have recently made efforts to commercialize other ventures based off their main project, hence why I opted to use Forgejo, despite it being much younger of a project.
Prerequisites
This document is mainly for myself, but if you happen to have come across this, and wish to follow along, I'll let you know right of the bat that you'll want to already have some familiarity with setting up a Linode or a Digital Ocean VPS. You of course could set this up on any VPS that can run Docker and NGINX, but the documentation here will mainly be using examples from Linode's Client Interface.
Additionally you'll need to have purchased a top level domain from a Domain Registrar. I have used Namecheap. Again, you can use whichever Domain Registrar you prefer, but the way you interface with your service might vary.
Much of these Prerequisites are covered in a previous presentation I gave on setting up a basic Website/App using Docker, NameCheap, and Linode. Please consult this document prior to proceeding with this tutorial, as it will be assumed you already have familiarity with this setup.
Initial Installation
Firstly, just log into your VPS via SSH. Once there establish a folder where you
will house your docker-compose.yml and the main Forgejo repos. I just dumped
this in my home folder like a slob, but it's probable a cleaner organization
might be in /usr/local or ~/.local or somewhere like that.
Anyways:
mkdir forgejo && cd forgejo
Within this folder use the default docker-compose.yml you can find on
Forgejo's Docker Installation Page
networks:
  forgejo:
    external: false

services:
  server:
    image: codeberg.org/forgejo/forgejo:11
    container_name: forgejo
    environment:
      - USER_UID=1000
      - USER_GID=1000
    restart: always
    networks:
      - forgejo
    volumes:
      - ./forgejo:/data
      - /etc/timezone:/etc/timezone:ro
      - /etc/localtime:/etc/localtime:ro
    ports:
      - "3000:3000"
      - "222:22"
You can change the ports if you like. The USER_UID=1000 and USER_GID=1000
stay the same as they are environment variables for your main $USER of your
VPS. Just know that this user cannot be Root.
You'll also need to create a git user on your host VPS. This user just needs
to be able to log in via SSH to your VPS. so:
sudo useradd git
And in the /etc/ssh/sshd_config file append the git user to the list of
users allowed to ssh in.
AllowUsers git
Again, if you have other users that need to login, just append the git user to
the end with a space (no new line).
Now we can return to our forgejo directory and use docker-compose to pull in
our image and spin up our container:
docker-compose up -d
Again, it's looking for the docker-compose.yml file, so just be sure you're in
the directory with said file in it.
Now you actually should be able to visit the Forgejo repo using your VPS's ip
address, at the port number you exposed (i.e. 3000), and see the initial
instructions:
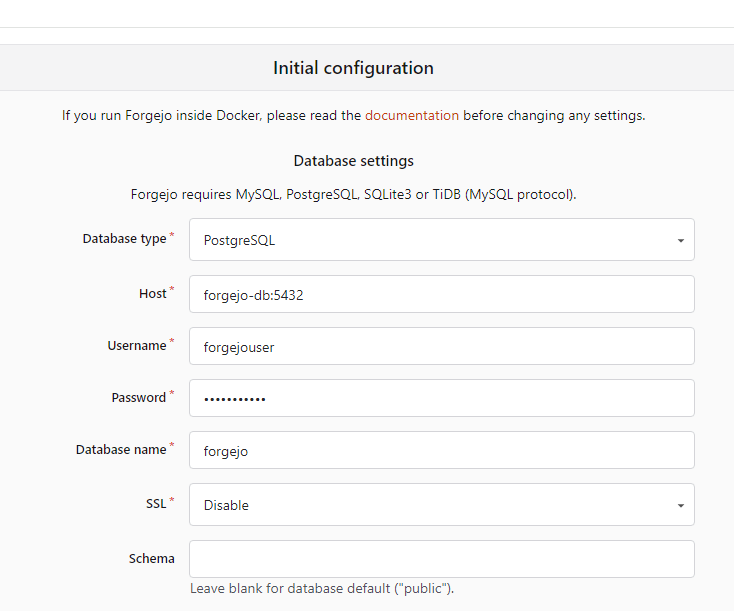
Don't worry about adjusting any of the configurations, we're not going to be using Forgejo for anything but a personal repo where we are the sole user.
Just navigate to the bottom and create an admin user. In the case of this documentation, this will be the only user of our Forgejo Repos, so just keep that in mind.
Once done, you should have a basic forgejo installation.
We're going to get to setting up SSL certs and reverse proxying through NGINX in a bit, but let's first setup the ability to setup pushing code via SSH.
First go to your profile icon in the top right-hand side and go to Settings >
SSH/GPG keys. You can find how to create ssh keys
here. Once you have copied and
pasted the keys in. You're going to want to be sure your git user on your VPS
. Simply invoke:
cd /home/git && mkdir .ssh && touch authorized_keys
In authorized_keys paste in your ssh .pub hash. Make sure it's the .pub
hash. Do not paste in your private keys.
Now we should be able to push code to our repos using ssh rather than http.
That said, we would have to use our raw ip address for all of this at this point. Test all this out first before proceeding. Create a few repos, push using ssh and http. Make sure everything works.
Setting Up SSL and Reverse Proxying Through NGINX
This is very similar to the process covered in my
previous presentation, but
basically we're going to use a subdomain of an existing top level domain I have
in order to setup SSL certs using LetsEncrypt via certbot.
First we'll need to navigate to our Linode Networks Dashboard and add the git
subdomain.
Once logged into the Linode dashboard, just find your tld domain and append a A/AAAA record that says:
git.mytld.dev
Or whatever your TLD name is just prepended with "git."
Once that is done, it might take 24 hours (but more likely will be instantaneous) for the DNS records to propagate. You can check if their ready using
dig git.mytld.dev
If the records are there, you'll see the proper output you'd expect from dig.
Next is to use certbot to generate the SSL certs. Since we're using NGINX as a
reverse proxy, we can just generate them with cerbot like so:
sudo certbot --nginx -d git.mytld.dev
You can always append --dry-run at the end of the command to see if it will
work first (recommended).
Once the SSL certs are generated and the NGINX configuration is appended. Navigate to your nginx config. In my case this lives in:
/etc/nginx/sites-enabled/default
Here you will find the generated NGINX config. You'll need to edit it to reverse proxy to the docker containing forgejo. Here we can use the recommended Forgejo NGINX config:
server {
    listen 80; # Listen on IPv4 port 80
    listen [::]:80; # Listen on IPv6 port 80

    server_name git.example.com; # Change this to the server domain name.

    location / {
        proxy_pass http://127.0.0.1:3000; # Port 3000 is the default Forgejo port

        proxy_set_header Connection $http_connection;
        proxy_set_header Upgrade $http_upgrade;
        proxy_set_header Host $host;
        proxy_set_header X-Real-IP $remote_addr;
        proxy_set_header X-Forwarded-For $proxy_add_x_forwarded_for;
        proxy_set_header X-Forwarded-Proto $scheme;

        client_max_body_size 512M;
    }
}
The main point of interest is everything in the location block. Certbot should
have generated the rest.
Once this is pasted in you can restart NGINX:
systemctl restart nginx
And now you can visit your git.mytld.dev site and it hopefully will work!
Addressing ROOT_URL issue
Once you login though, you'll notice an error that caused me quite some frustration. Basically you'll likely see an error regarding the fact that Forgejo was setup using your VPS's IP address and that it makes no guarantees about the quality due to the mismatch of what it perceives as a different TLD being used. We need to change this.
Now, Forgejo's docs talk about an app.ini and anyone who has used Gitea in the
past will be familiar with this, but i t took me many hours to realize the
app.ini was not where the documentation as of version LTS(v11.0.3) is
incorrect about where this file lives. It took me embarrassingly long to realize
the generated app.ini file resides in the gitea directory, and not at the
directory where the docs say it is. So from the forgejo directory on your host
machine VPS:
cd data/gitea/conf
And here you will find the app.ini. You'll need to change a few things, change
the following fields using your editor of choice:
[server]
DOMAIN = git.mytld.dev
SSH_DOMAIN = git.mytld.dev:222
ROOT_URL = https://git.mytld.dev
Just restart the docker container:
docker container restart forgejo
And This will rid you of the annoying warning message on login and also make sure the proper ssh address is provided when opting to create a repository through which you will mainly be pushing changes via ssh.
A word on backing up your Forgejo
Eventually you'll want to backup your Forgejo for various reasons. Firstly just because it's a good idea to back up pretty much anything. But additionally eventually your little $5 per month VPS might be too small for all the repos you could be potentially adding to this.
In order to backup your forgejo, you'll want to use scp. Make sure you know
the path to your forgejo (just the path of where you initialized the docker
container) and of course you'll need to know the username and password that can
SSH into your VPS. On your home device, just invoke:
scp myusername@<my_vps_ip_address>:/path/to/forgejo path/on/myhostmachine
And this will copy all the files in your forgejo to your home machine for you to have as a backup.
Conclusion
And that's it! My apologies if this document feels a bit off the cuff, but as I mentioned at the beginning this document is mainly for my own future reference. If you have any desire to reach out to me though regarding this or any other tech related topic, please feel free to do so via my email.